
Inline Skating
 MiniDisc Hacks
 PC Utilities
 Free Games
Fixing a Sony MZ-R2 MD Walkman
Part 1: problems
 Old
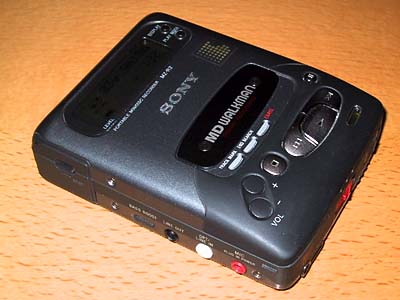
Sony minidisc engines are well known to have fatal problems. For
example, I bought my MZ-R2 minidisc Walkman in September 1995. It
worked fine for a few months but in spring 1996 it started to have
problems to read discs. In the beginning, turning the unit on a side or
upside
down helped a bit. However, I sent it to service because the
one-year warranty period was still running.
Servicing fixed the
problem --
they probably replaced the optical block (the whole device was not
replaced as the covers had same scratches as before servicing). Fixed
unit worked (surprisingly) long but after several years it started to
behave similarly. However, it was not worth of the expensive service
price. By turning the unit on its sides, and adjusting MO_FCBIAS
in the service mode I could still use it.
I used the Walkman only as a desktop player and in my car. So I could forget the problem completely after buying a desktop MD recorder and a car MD player few years ago.
Finally now, in 2003, more than seven years after the service visit, one day I needed a portable recorder. However, my MZ-R2 was (almost) completely unless and service mode adjustments didn't help at all. Every disc generated lots of seeking noise and finally a . As I had nothing to lose, I tried to fix the problem by myself.
Fixing the optical block
CAUTION! You can damage the device seriously when opening it. You are doing everything at your own risk. This solution that helped my MZ-R2 may not help yours. Also, you can make the device useless by adjusting (incorrect) values in the service mode. Be careful when working in the service mode!I found some discussions in www.minidisc.org about Sony optical block problems. My problem was exactly same. The focusing lens attachment is connected to the optical block with a nylon spring. The system moves the focusing attachment using the coils in it. However, nylon spring characteristics probably change gradually and finally the device fails to control the laser beam focusing.
I could not find any instructions how to open the device to get a good view to the optical block so I had to found it out by myself. The easiest way to tune the optical block is:
- Check your working environment. You will have to touch the electronics, so ESD precautions are required!
- Remove any discs and battery from the unit.
- Unscrew the six screws in the bottom part of the unit. Note that some of the screws may have different length.
- Remove the bottom cover. Now you will see the main board and small power supply board. (Wow, what a PCB... it could not have been very cheap to manufacture... including those hand-made corrections on it...)
- Now carefully open the locking levers of five membrane cable connectors on the main board (the larger PCB). Pushing the small levers on both sides of the connector simultaneously to the direction of the cable opens the locking lever. The locking lever moves less than one millimeter.
- After opening the levers, pull all cables out from the connectors.
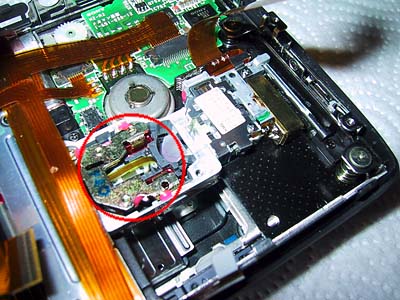
- Unscrew the five screws of the main board and remove the board. Now you will see the optical block including lenses and laser etc.
 When
you shake the opened device carefully, you can see the focusing lens
attachment shaking at the end of the optical path. Because the focusing
coils are mounted in that moving part, a small four-wire
membrane cable connects the focusing lens attachment to the other
optical block. The problematic white nylon spring can be seen under
that cable.
You can see several thin parts on the nylon spring. They allow moving the focusing attachment slightly in two directions. First I tried to add some glue drops on those thin parts of the spring to make it stiffer. It helped a for a while but the device started to fail in a few hours, showing even for every disc. So I had to remove the glue.
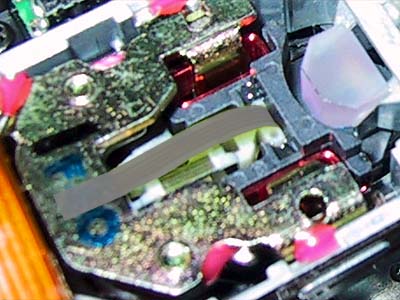
My working (at least until now) solution is to add a stripe of PVC tape on the four-pin membrane cable. I used standard electrician's PVC tape. The tape stripe is about as wide as the membrane cable and starts where the cable goes into the focusing attachment and ends on the large metallic structure around the attachment. The tape changes the vibration characteristics of the focusing attachment so that the device will work!
 However,
you have to assemble the device before you can try it... Be careful to
check that the main board is well in its place before tightening the
screws. (My board was not easy to install correctly. Check especially
the mic, line, and phone jacks.) Also check that the membrane cables go
straight into the connectors after locking the locking levers,
otherwise they may be short-circuited.
Finally you may need to adjust MO_FCBIAS in the service mode to fine-tune the operation of the unit. Try values from 7A (default in my unit) to 90 (suggested by Graham Baker). For reference, my MO_FCBIAS is now 8A. To adjust the setting do the following:
- Remove all power sources (battery and power supply) from the MZ-R2.
- Slide the HOLD switch on the unit to ON position.
- Connect the remote control to the recorder.
- Now, press and hold STOP on the remote control and PLAY and STOP on the device while you slide the battery in the compartment.
- The test mode is activated successfully if you see the display flashing the firmware version number.
- Now press PLAY (on the device) to enter the menu.
- Press VOL+ until you can see the 020 OFFSET submenu. Press PLAY to enter the submenu.
- Press PLAY to go through the settings. Stop at 026 MO_FCBIAS.
- Now use VOL+ (decrease) and VOL- (increase) to adjust the hexadecimal value.
- Press PAUSE to save the value.
- Remove the battery to exit the service mode and to test the operation of the device with a disc. Re-enter the service mode to test different values.
See also
Part 2: "Resets" by touching

